HPC for Neuroimaging
Useful Links
- HPC Introduction
- HPC Documentation University of Arizona High Performance Computing Documentation
- HPC Account Creation
- OOD Open On Demand Dashboard to interact with HPC resources.
- Check Disk Quota and Usage
Introduction
This page provides a tutorial for the neuroimaging community about getting started with the HPC (High Performance Computing) cluster at the University of Arizona. The focus is on issues that are likely to be most relevant to neuroimaging. Interfaces for interacting with the HPC are much easier to use than they were years ago, and they are evolving rapidly. Look at Date Updated above to ensure that you are looking at reasonably current documentation.
The HPC is a very large cluster of linux machines at the University of Arizona. You can interact with the HPC at the command line or through a graphical user interface, but to use it effectively you should have some basic knowledge of unix.
Many big universities have similar HPCs to support research. In additon, the NSF funds other computing services for scientific research, for example Cyverse and Xsede, both of which are nationwide. For now we’ll describe the U of A HPC.
PROS
- Free to U of A researchers, so you can run a lot of image processing using your monthly time allocatation on the HPC.
- If an image processing tool requires huge amounts of RAM (e.g., maybe some GIFT processing?), the HPC can provide that.
- The HPC provides lots of high-powered NVIDIA GPUS which can really speed up our neuroimaging tools IF they are GPU-enabled.
- The HPC can run Singularity containers.
- The HPC can scale up to run lots of processes in parallel. For example, even though Freesurfer’s recon-all will still take 12-24 hours to run, you could run it on dozens of subjects at the same time.
- Once you are familiar with the HPC, if it is not sufficient for your needs, you could request access to XSEDE. Again, you’ll get a lot of processing time for free.
CONS
- Data must be deidentified before you upload it to the HPC (the HPC is not HIPAA compliant). See Deidentifying Data.
- You have to move your data to and from the HPC for processing. See Transferring Files.
- The HPC is meant for processing, not storing your data:
- You get ~200 GB of space under /extra (This is not backed up).
- You can get up to 1 TB of space on xdisk for up to 150 days (this is quick and free).
- You can purchase storage space, for about $40 per Terabyte per year.
- The storage options will be changing during 2020
- The CPUs are not that fast, so do not expect processing of an individual subject to be faster than your local machine (I find it is slower than my mac pro).
- You do not have administrative privileges:
- You are not allowed to run Docker
- You cannot build a Singularity container from a Singularity recipe file on the HPC.
- See Sylabs Cloud Builder for building Singularity containers from a recipe file. I have built a 1.6 GB image in about 7 minutes. It is free, and if it’ll handle the size and build time for your container, then it is really fast and easy.
- If your recipe is too big for the Sylabs cloud, see Singularity on Cyverse for a solution.
- GPU processing is complex to set up and NOT a universally available panacea for slow processing.
- The software tool has to be designed to use GPUs and that is only practical for certain types of operations.
- For example, GPUs don’t help at all with Freesurfer’s recon-all but can help with FSL’s probtrackx2, Bedpostx and Eddy, all three of which provide gpu-enabled versions.
Tutorial Introduction
Below I lay out a set of steps for you to try, in what I hope is a reasonable order. Please let me (dkp @ email.arizona.edu) know if any of it is confusing or wrong. Don’t assume it is just you! If you get confused by the sequence of steps or the wording seems ambiguous or misleading, then other people will have the same experience and the tutorial can be improved, so I need to know. Thanks.
Sign up for an Account
Note
If you are a PI, you must follow the steps in this section to create an account and add users. You do NOT have to sign on to the HPC or learn Unix or anything else, but you must create an account to get an allocation of HPC resources for your lab, and you must add any staff or students who you want to have access to that allocation. See PI Account Instructions.
- Everyone must go to the HPC Accounts Creation page for instructions on signing up.
- It’ll take under an hour for your home directory to be created, but you won’t have access to disk space on
/extrafor a while longer. The HPC will send you an email when your home directory is ready.
Sign on to OOD
Once you have an account: log on to OOD (Open On Demand). Be persistent if this is your first time (it may take a few trys to be acknowledged as a bonafide user). OOD provides a dashboard interface to the HPC system:
The OOD Dashboard: Along the top is a grey bar with the options: Files, Jobs, Clusters, Interactive apps.
Click each one to see what it offers. Briefly:
- Files offers you a graphical user interface for exploring your directories.
- Jobs allows you to see the status of running batch jobs and to delete them. We’ll get to this later in the section on batch jobs.
- Clusters allows you to open a command line (a.k.a shell or terminal window) on one of the machines (e.g., ocelote or el gato). To use this, you need to know some unix commands.
- Interactive Apps allows you to open a graphical desktop, Jupyter notebook or R-studio session.
We will focus on Files for now. On the top left, click Files. You will see options to view your home directory (at least). Select your home directory. You should see something like my home directory displayed below (but you’ll have less stuff in yours).
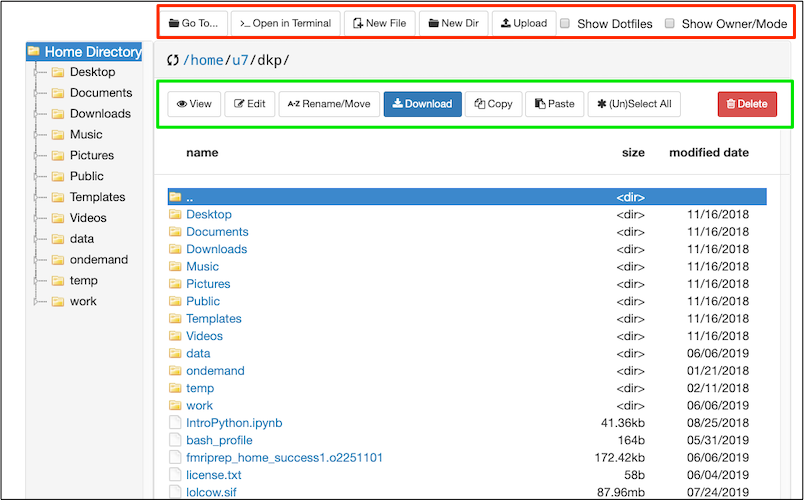
Here the OOD File Explorer is displaying the contents of my home directory in the main panel. Regardless of what is displayed in the main panel, the Home Directory is always displayed on the left of the file explorer.
In the Red rectangle (top) from left-to-right: I can use Go To.. to type in the path I want. >..Open in Terminal provides the option to open a terminal window on one of the machines. Other buttons allow me to create new files or directories, and upload or download a file (something small like a text file or image). Checking the box Show Dotfiles will reveal hidden files and folders in the current directory. These hidden files and folders are usually important for configuration. Checking the box Show Owner/Mode will display permissions. Try checking each box to see what it does.
In the Green rectangle: buttons allow various file operations, importantly the Edit button will open a text file, like a script, for editing. You can copy and paste directly from your local computer to the editor. Try various functions.
Note
You are NOT using your time allocation when you are browsing in OOD, or the File Explorer or the terminal, as long as you are not running anything intensive. Check out Running out of time to get a better sense of the differences between the login mode and the interactive or batch mode.
The File Explorer and Editor
Let’s try using the File Explorer and the Editor. They are really nice and easy to use.
On the top left of the File Explorer is a
Go To...button. Click on it and type/extra/dkp/Scripts.Select
interact.sh. SelectCopy.On the left, the File Explorer shows your home directory. Click
Home Directoryat the top. SelectPaste.You should now be in your home directory and have a copy of
interact.shwith you.With
interact.shselected, clickEdit.interact.shis a bash script that can put you into interactive mode.Let’s make a senseless edit so you can see how the editor works: Add the word
helloto the COMMENTBLOCK, like this:-I # puts us in interactive mode hello -N interact # name the job interact
The
Savebutton on the upper left of the editor is activated by your change. Click it and save.There are some settings for how the editor appears on the right: font size, language (it should say
SHindicating that this is a shell script), color scheme. Try something fun like changing the color scheme ; ).
Note
You can use the OOD gui to create empty text files, and then use Edit to open one of these empty text files and paste in the contents of a script (e.g., interact.sh or buildSIF.sh) from the browser. Alternatively, you could download the scripts to your local machine and then upload them using OOD.
How the HPC differs from your Desktop Computer
Unlike the computer on your desk, the HPC is a group of computers with several different host machines: bastian, filexfer, login (login node for el gato), login2 and login3 (login nodes for Ocelote), and, of course, Ocelote and el gato (A new machine is being introduced in 2020). The storage and processing power are shared with other researchers. The different hosts provide different capabilities: For example, bastian handles security, the login nodes are for looking around and learning (that is where you are now), filexfer handles data transfers. Ocelote and el gato are two different computing clusters with different capabilities. Although you have more research time on Ocelote, the operating system is older and some things won’t run (Ocelote’s operating system is being upgraded to match el gato during 2020). See the section on Host OS and Singularity to understand why you might need to use el gato for some tasks until the Ocelote upgrade is complete.
Storage
No matter which host you are contacting, your storage is the same: Your home is the same. Your extra directory is the same.
Storage in your home directory is limited. Your HPC home directory will get backed up regularly BUT it is not very big. It certainly is not big enough to store your imaging data or even build most BIDS singularity containers.
You have more space in your extra directory, and it is probably enough for now. If you don’t see an extra directory yet, be patient. It will be created. Later you can look into using xdisk to sign up for as much as 1 TB of space for up to 150 days. You can currently buy or rent additional space if you wish. Again, changes are coming to storage in 2020.
Note
As of 4/06/2020: There are big changes afoot during Spring 2020: New SSD storage will be larger and faster. Storage space in your home directory will be increased dramatically to 50 GB, but will not be backed up. XDisk space up to 20 TB can be requested by PIs for 6 months, renewable once. /extra will be migrated. You won’t be able to rent space any more, but you can request space. The HPC group will work with you to make sure you have what you need. This is a good change. See the temporary Box documents HPC Storage Policies: and Data Migration Timeframe:.
Jobs: Interactive and Batch Mode
- Up to this point, you have been in login mode. You can look around in the directories and create small files, edit a script etc. In login mode you are not using any of your monthly research allocation hours.
- If you try to do a task on the login node that takes too many resources (e.g., run neuroimage processing or build a large singularity container), the task will be killed before it completes. Instead, you have to run such a task as a job. All jobs use your allocation hours and are tracked using the PBS job submission system:
- Interactive A job can be submitted to use interactive time (e.g., any of the
Interactive appslike a Desktop, Jupyter notebooks or R-studio available from OOD). You can even have interactive time at the terminal, which we explore below. - Batch A job can also be submitted to run in batch mode. A batch job is one where you submit a script to be run, and the cluster runs the job when the computing resources are available. We’ll explore this too.
- Interactive A job can be submitted to use interactive time (e.g., any of the
- Back on the OOD dashboard, click Jobs ➜ Active Jobs. It is probably not very interesting right now. You don’t have any jobs running on el gato or Ocelote.
- Check out Running out of time to get a better sense of why you need to care about creating jobs. The example focuses on building and running singularity containers.
Running your First Job
Let’s run a very small job so you can get a sense of how it works.
Remember you copied a script called
interact.shto your home area? Open it in the editor if it is not still open.It is a bash script. This bash script starts
qsubwhich defines the job. In the COMMENTBLOCK I describe some of the qsub flags.When we run this script, it’ll run for up to one hour, after which it’ll end. This is the
walltime=1:00:00. (We’ll delete the job sooner than that so as not to waste your allocation. You’ll only be charged for the time you actually run).However, your alloction time is not just about walltime. One hour using 1 cpu and 4 GB of memory is different than one hour using 28 CPUs and 168 GB of memory. Because of this, your allocation time is more complicated than just walltime. Roughly it is the
# of CPUs * walltime. And just to keep everyone honest, the amount of RAM is limited (e.g., 6 GB per CPU on Ocelote).Open an Ocelote shell, because you have LOTS of hours on Ocelote: You can open a shell from the OOD dashboard:
Clusters➜Ocelote Shell Access. Or, in the File Explorer, select>_Open in terminal➜Ocelote.Ensure that interact.sh is executable:
[dkp@login3 dkp]$ chmod u+x interact.sh
In the terminal window, type
./interact.shto see the usage message (the./is necessary if you have not got your home directory in your path):[dkp@login3 dkp]$ ./interact.sh
You see the usage message:
this script will put you in interactive mode with 4 cpus,
24 gb of ram and one hour of walltime
You must enter the group to be charged
e.g., interact.sh dkp
=============================
These are the groups you belong to
dkp current allocations:
------------------------------
Group                   Type                    Available Time
-----                   ----                    --------------
dkp                     Standard                35999:39
dkp                     ElGato Standard         7000:00
The script will request a modest 4 cpus, 24 GB of RAM and 1 hour of walltime (walltime is just clock time). That should do the job for building a large *.sif file (but we are not going to do that right now). Here is what this process looks like when you run it with your group name:
[dkp@login3 dkp]$ ./interact.sh dkp
starting interactive session with 4 cpus, 24 gb of ram and 1 hour of wall time
qsub: waiting for job 2428450.head1.cm.cluster to start
qsub: job 2428450.head1.cm.cluster ready
[dkp@i0n1 ~]$
- The first prompt
[dkp@login3 dkp]$indicates that I am in login mode. - I request an interactive node for group dkp:
interact.sh dkp. interact.shtells me how many resources I will get:starting interactive session with 4 cpus, 24 gb of ram and 1 hour of wall time.- At first, qsub reports it is waiting (3rd line above), so your interactive mode has NOT started yet. Give it some time (usually a few minutes).
- qsub will report when it is ready (4th line above), and then give you an interactive prompt, like this
[dkp@i0n1 ~]$. Note the differences between this prompt and the login prompt. - Congratulations! You are in interactive mode, not login mode!
Just because you start the interactive session with this request for 1 hour of walltime, does not mean you have to use the whole hour. You can delete the job. Back on the OOD dashboard, click Jobs ➜ Active Jobs. You should see your job listed:
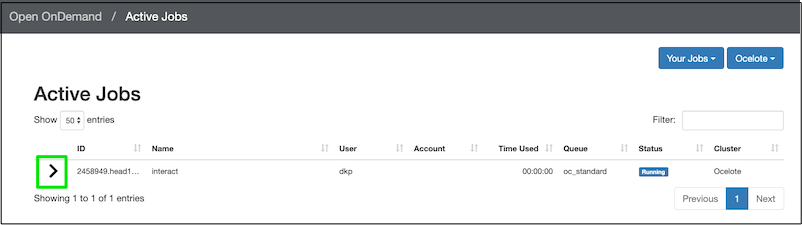
Click the disclosure triangle (in the green box) to see more details of the job. Once you have opened the job details, you’ll see a red delete button on the lower right, so you can end the job.
You can also learn about the job in the shell window. For example, qsub told me the name of my job when it started: 2428450.head1.cm.cluster. If you are not sure what your job is called, you can ask for your job names like this (use your own groupname instead of dkp):
qstat -wa -u dkp
Your jobs will be listed. Their status is also indicated: Q for queued; R for running. You can also look at the qsub log file as it is being created:
qpeek 2428450
In addition to being able to delete a job in the OOD dashboard, you can delete it in the terminal window, like this (you have to use your job name though):
qdel 2428450.head1.cm.cluster
Job deletion will take a moment. But then you will be charged only for the time interactive mode was actually running. This is a general principle, if you ask for more time and processing power than you use, you’ll only be charged for what you use. However, if you ask for a LOT of resources, it may take longer for your job to actually start.
You can view your time allocations like this:
va
Warning
The interact.sh script differs from most job submissions because all you have to do is type the script name. Usually, to run a job script you must type qsub before your script name. See Running out of Time.
Additional script examples are available on bitbucket and in /extra/dkp/Scripts.
Running Lots of Jobs
You are probably not interested in the HPC for running a single small job.
- for loop: Although you could write a for-loop to spawn a lot of jobs, or run job after job at the command prompt, this can overload the system scheduler and lead to problems with overall performance (see Best Practices).
- BIDS allows you to process multiple subjects at a time, but the processing is sequential, and if one subject crashes, none of the following subjects will get run. In addition, you need to calculate the required CPU, memory and walltime resources for the whole set of subjects.
- qsub arrays The most efficient way to run lots of jobs is with a job array. Unfortunately, job arrays work best on consecutively numbered jobs (e.g., 1,2,3,4) and we tend to want to run on subject directories, that probably are not consecutive.
- qsubr To address the problem of non-consecutive subject directories, see the script qsubr (There is also a copy of qsubr in /extra/dkp/Scripts on our UofA HPC).
qsubr will create a qsub array job for each subject in a list of subjects (one subject per row in a text file) you pass it:
qsubr Scripts/arraybip2prep.sh SubjectLists/plante333-334.subjects
For qsubr to process a script, you must make some additions to that script so that it knows it has to look at a subject list and iterate through rows:
############################################################
#### BEGIN STUFF TO ADD TO ARRAY SCRIPT CALLED BY QSUBR ####

### Change to the directory where the PBS script was submitted. This is harmless.
cd $PBS_O_WORKDIR

### This is critical for any call to qsubr. It gets the subject names from the list.
### Note that the subject list can be specified, but defaults to subjects.txt in the current directory if it is not specified.
### Pull filename from line number = PBS_ARRAY_INDEX
Subject="$( sed "${PBS_ARRAY_INDEX}q;d" "${SUBJS:-subjects.txt}")"

### The following is useful for documentation purposes.
### The array index and subject number get echoed to every output file produced by qsub.
### Print job information to each output job
loginfo="JOBNAME=$PBS_JOBNAME, JOB ID: $PBS_JOBID, Array Index: ${PBS_ARRAY_INDEX}, Subject: sub-${Subject}"

### Also create a log file for the job that echos the subject number and index of each subjob to a single log file.
echo ${loginfo} >>${PBS_JOBNAME}.log
echo ${loginfo}

#### END STUFF TO ADD TO ARRAY SCRIPT CALLED BY QSUBR ####
The variable Subject is then passed to the singularity run command in exactly the same way you passed Subject to qsub in the run scripts, e.g.:
singularity run --cleanenv --bind ${MRIS}:/data /extra/dkp/singularity-images/mriqc.sif /data /data/derivatives/mriqc participant --participant_label ${Subject} -w ${STUFF}/mriqc_work --verbose-reports
qsubr will create a qsub array job for each subject. It will treat each as a separate job, so all you need to know is what cpu, time and memory resources one subject job requires. Whenever there is room in the HPC job queue to run one or more of your jobs, they’ll start. View working examples (anything called array*.sh) of these array scripts.
Transferring Files
You can use the command line or graphical tools to transfer data to and from the HPC. Your allocation time is NOT used for transferring files, however, if you try to transfer large files or lots of files on the login node, your transfer will be killed. Options are described in detail on the Transferring Files page.
Tiny Files
Small files can be moved using Upload and Download in the OOD file explorer. For example, this should work for uploading or downloading a text file or a single anatomical image. If you ask to transfer something that is too big, it’ll just fail (but may not give a good message), so be suspicious and check.
Medium Sized Files
Here’s an example of using scp from the commandline to transfer a large singularity container from my local mac to the HPC. It is also be a reasonable solution for a single subject BIDS dataset:
scp -v bids_data.zip dkp@filexfer.hpc.arizona.edu:/extra/dkp
I have to indicate who I am on the hpc: dkp. The transfer is handled by filexfer.hpc.arizona.edu. But never fear, the file will end up in my /extra/dkp directory as I specify. I have 200 GB of space in /extra/dkp and only 15 GB in my home directory, so I generally will NOT want to transfer imaging files to my home directory. This is a reasonable solution for data transfers of less than 100 GB, though not as fast as Globus.
Big Files and Directories: Globus
- Globus is the preferred tool for transferring data to and from the HPC, and even between directories on the HPC. There is a description of the Globus setup on the Transferring Files page.
- Globus provides a downloadable program for your local computer so you can treat your computer as an endpoint. You interact with the endpoints in a browser window with two panels (e.g., one panel for your local machine and one for the HPC).
Warning
Check the preferences in your locally installed Globus Connect Personal to ensure that you have access to the directories you need (by default, you only have access to your home directory). In addition, you must explicitly tell Globus (Under its Preferences) to allow you to write to these directories.
Warning
Globus does not transfer symbolic links. That is, if ALink points to AFile, then Afile will be transferred, but Alink will not. If you need symbolic links, you’ll have to tar up your directory locally and then untar it on the HPC.
Optional Section: Return to a Previous Terminal Session Using Screen
On your personal mac or linux computer, each terminal is open in a particular directory. You can scroll back and see the commands you ran, and you can watch the output of a long process as it appears. If you log in to the HPC, you have this up until your terminal session ends (either you close it or it times out). When you log back in later, you are at a new fresh terminal that has lost this potentially valuable information. Fortunately, there is a unix commandline tool called screen that can help with this. Screen saves sessions so you can reconnect later, even though you may have closed your HPC session. Your process keeps running in the screen and you can check on how it is getting along by attaching to it. Here is a brief tutorial on getting started with screen.
Screen Tutorial
Let’s see if you have any screens (probably not):
screen -list

No Sockets found in /var/run/screen/S-dkp.
Assuming you are NOT currently in a screen session (and you aren’t if you’ve never done this before), you can create a new screen session like this:
screen
You will be switched to that new screen. You can display the name of your current working screen session like this:
echo $STY

1851.pts-4.login2
The screen has a 3-part name: screenprocessID.sessionname.host e.g., 27589.pts-4.login2
After creating the session, you should be able to refer to it with its screenprocessID or sessionname.hostname or both: (1851.pts-4.login2 or 1851 or pts-4.login2).
Detach from a screen Let’s say you don’t want to be in the screen anymore, but you want to be able to return to it later. You should detach from the screen:
screen -d 1851
Note
If you have only one attached screen, then you can simply type screen -d, but as soon as you have multiple attached screens, you need to be specific.
Now look at the state of things:
screen -list

There is a screen on:
      1851.pts-4.login2       (Detached)
      1 Socket in /var/run/screen/S-dkp.

echo $STY
Your screen exists, but is detached. echo $STY returns nothing because you are no longer in a screen session.
You can also create a screen with a meaningful sessionname, and you will be switched into it. In this case, the name is 2 parts: screenprocessID.sessionname:
screen -S fred

echo $STY

4032.fred
You can list your screens from inside a screen session. If we list the screens from inside fred, we see that fred is attached:
screen -list

There are screens on:
      1851.pts-4.login2  (Detached)
      4032.fred          (Attached)
The fred screen can be referred to as 4032.fred or 4032 or fred. Let’s detach from fred, and then check that we are not in a screen session with echo $STY:
screen -d fred
echo $STY

  There are screens on:
        1851.pts-4.login2  (Detached)
        4032.fred          (Detached)
Both screens are now detached.
Re-attach to a screen session:
screen -r fred
echo $STY

4032.fred
From fred, create a third screen, joe. We should be switched to joe and both joe and fred should be attached. Check with echo $STY and list the screens:
screen -S joe
echo $STY
screen -list
There are screens on:
      27376.joe           (Attached)
      1851.pts-4.login2   (Detached)
      4032.fred           (Attached)
3 Sockets in /var/run/screen/S-dkp.
Use -x instead of -r to switch to the attached screen:
screen -x joe
Warning
If you create screens within other screens (as we created joe from within fred) you can get into trouble. Ctrl AD can get you out, as you’ll probably do this at some point. However, it is best to detach from one screen before creating a new one.
When you have lost your prompt! From within a screen session that is busy or messed up, you can press Ctrl AD (Hold control, and press A and then D; these are not uppercase).
Once you have started a long process, like running a neuroimaging container, you can use Ctrl AD to detach from the screen (or you can just close the HPC browser tab and your screens will be preserved).
Kill Perhaps you have created a lot of screens. You’d like to get rid of these screen sessions altogether (not just detach from them). Here’s my current list:
screen -list

here are screens on:
      1851.pts-4.login2  (Detached)
      4032.fred          (Attached)
      27376.joe          (Attached)

3 Sockets in /var/run/screen/S-dkp.
Note
Your situation may be different depending on how much you’ve mucked about creating and detaching. But you probably need some cleanup.
Here we kill a screen and then list the screens to ensure that it is gone:
screen -X -S 1851 kill
[screen is terminating]

screen -list
There is a screen on:
        4032.fred       (Attached)
        27376.joe       (Attached)
2 Socket in /var/run/screen/S-dkp.
Note that 1851 is no longer listed after being killed. Both detached and attached screens can be killed. In additon, when you are in a screen session, you can exit to both detach and kill the session:
screen -r fred
exit
[screen is terminating]
screen -list
  There is a screen on:
          27376.joe       (Attached)
  1 Socket in /var/run/screen/S-dkp.
Note
When you terminate a screen, the prompt may jump to the bottom of the terminal window!
There is more, but this should get you started. BTW, the screen utility may be lurking on other machines you use, like your mac.
Deidentifying Data
Remember, the HPC storage is not HIPAA compliant. Your data must be deidentified before being uploaded. This means you should convert it to NIFTI and then deface any T1 images. The most commonly used defacing tool is the Freesurfer deface tool. Here’s a simple script, deface.sh to call the deface tool. The deface script assumes you have the following three files in your path:
- a binary of mri_deface for your computer (and the old mac binary is still works on Mojave),
- talairach_mixed_with_skull.gca
- face.gca
Although defacing is a pain, it will make your data suitable for upload to data sharing sites if you ever need to do that.
Optional Section: SSH TO HPC
Feel free to skip this section if you are not especially interested right now. If you prefer the command line, you can ssh to the HPC e.g.,:
ssh dkp@hpc.arizona.edu
Of course, you’ll need to put in your own username, which probably is not dkp, And then you’ll go through the authentication process:
Password:
Duo two-factor login for dkp
Enter a passcode or select one of the following options:
Duo Push to XXX-XXX-XXXX
Phone call to XXX-XXX-XXXX
SMS passcodes to XXX-XXX-XXXX (next code starts with: 2)
Passcode or option (1-3): 1
Success. Logging you in...
Last login: Sun Jan 21 19:16:14 2018 from http://66-208-204-2-pima.hfc.comcastbusiness.net
***
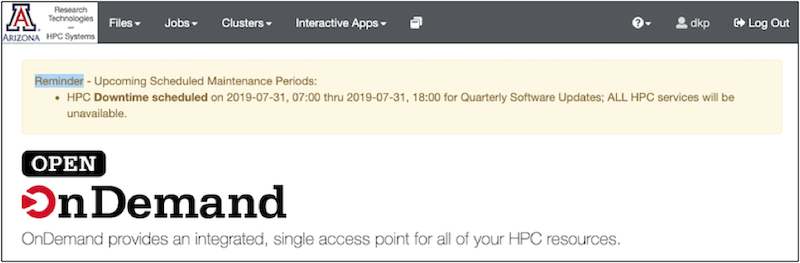
The University of Arizona HPC systems will be down from
2019-07-31 07:00:00 thru 2019-07-31 18:00:00
for Quarterly Software Updates; ALL HPC services will be unavailable.
***
===============
http://HPC.ARIZONA.EDU
===============
Please select a target system to connect to:
(1) Ocelote
(2) El Gato
(Q) Quit
(D) Disable menu
To log in to el gato, you’d type 2 and see something like this:
Sending you to El Gato...
The authenticity of host 'http://login.elgato.hpc.arizona.edu (10.140.86.3)' can't be established.
RSA key fingerprint is XXXXXXXXXX.
Are you sure you want to continue connecting (yes/no)? yes
Warning: Permanently added 'http://login.elgato.hpc.arizona.edu,10.140.86.3' (RSA) to the list of known hosts.
[dkp@login ~]$