HeuDiConv
Introduction
HeuDiConv (Heuristic Dicom Conversion) provides sophisticated and flexible creation of BIDS datasets. It calls dcm2niix to convert the DICOMS to NIFTI with sidecar JSON files. It also produces the additional files that BIDS expects (e.g., CHANGES, dataset_description.json, participants.tsv, README etc.). Similar tools include:
- BIDSkit
- DAC2BIDS
- Dcm2Bids
- dcm2niix batch. See also this excellent example of working through the whole process.
HeudiDiConv runs in a container (Docker or Singularity) or by pip install (e.g., an Anaconda environment). Instructions for pip installs are available in the official readme.
- On this page, I provide tutorials for two of the heuristic files provided with HeuDiConv.
- The first heuristic is called convertall.py.
- The second is called reproin.py.
- convertall.py is better if you already have DICOM files to convert. However, convertall.py requires that you modify a Python module to specify your particular naming scheme to HeuDiConv. This process is detailed below with explicit examples for typical U of A sequences. It isn’t horrible. Don’t assume that the Region and Exam assigned at the scanner will be available to convertall.py in the same way they are available to reproin.py.
- reproin.py takes a different approach. reproin requires you to follow a particular naming scheme at the scanner instead of modifying a Python module. If you have not yet named your scanner sequences, then it is worth using the reproin naming scheme. Overall, reproin is easier, but is more limited in its support for image types that are not yet supported by BIDS.
- reproin.py is “part of the ReproNim Center suite of tools and frameworks. Its goal is to provide a turnkey flexible setup for automatic generation of shareable, version-controlled BIDS datasets from MR scanners.” reproin site
Links
A number of useful resources are available for you to consult. Here are the ones I’ve found.
- HeuDiConv github site
- Stanford Center for Reproducible Neuroscience Tutorials.
- convertall.py
- reproin.py
- A test dataset to use with the convertall.py tutorial on this page dicoms_heudiconv.zip
- A test dataset to use with the reproin tutorial on this page dicoms_reproin_UA.zip
- A final version of convertall.py
- An example script for running the iterative part of a convertall.py script: hdc_wrap.sh. Read over the script! It makes some hardwired assumptions about the way your dicoms are named and nested (especially in the case of using a session).
Warning
Be careful to name sessions using only dashes and not underscores. That is itbs-pre will work fine, but itbs_pre will cause you pain in later processing.
convertall.py
Run HeuDiConv in a 3-step process:
- Step1 By passing some path information and flags to HeuDiConv, we generate a heuristic (translation) file, convertall.py and some associated descriptor text files. These all get placed in a hidden directory, .heudiconv under the output directory.
- Step2 We create a subdirectory under the output directory and call it code. Here we place a copy of the Python3 heuristic/translation file (in this case, convertall.py) which we will modify by hand to specify the output names and directories, and the input DICOM characteristics. A file called dicominfo.tsv contains a listing of the DICOM characteristics that we can use as criteria. Most of the description in this section pertains to editing convertall.py for your own dataset.
- Step3 Having revised convertall.py, we now call HeuDiConv to run it on one or more subjects and sessions. Each time we run it, an additional subdirectory is created under .heudiconv that records the details of that conversion. We can run it again on new subjects and sessions as they become available. convertall.py, along with the .heudiconv hidden directory, provide provenance information that you should retain with your dataset. You can rename your heuristic file, which may be useful if you have multiple heuristic files for the same dataset.
The suggested project structure looks like this:
In a top-level project directory (e.g., MyProject), you keep a Dicom directory and a Nifti directory.
The Nifti directory contains the following:
The hidden .heudiconv directory which records provenance information about the DICOM to NIFTI conversion for each subject or subject session.
The code directory (which the bids-validator ignores) and where you should put your manually modified convertall.py
All the subject directories for the unprocessed NIFTI files (The subject directories are suitable for export to data repositories.)
A derivatives directory to hold the output of later processing with other apps:
MyProject
|-- Dicom
|   `-- 219
|       |-- ASL_3D_tra_iso_22
|       |-- AX_DE_TSE_14
|       |-- Bzero_verify_PA_17
|       |-- DTI_30_DIRs_AP_15
|       |-- DTI_30_DIRs_AP_TENSOR_16
|       |-- JJWANGS_pCASL_PLD1800_24
|       |-- JJWANGS_pCASL_PLD1800_34
|       |-- Localizers_1
|       |-- MoCoSeries_19
|       |-- MoCoSeries_31
|       |-- Perfusion_Weighted_23
|       |-- Perfusion_Weighted_25
|       |-- Perfusion_Weighted_33
|       |-- Perfusion_Weighted_35
|       |-- Post_TMS_ASL_3D_tra_iso_32
|       |-- Post_TMS_restingstate_30
|       |-- T1_mprage_1mm_13
|       |-- field_mapping_20
|       |-- field_mapping_21
|       `-- restingstate_18
|-- Nifti
|   |-- .bidsignore
|   |-- .heudiconv
|   |   `-- 219
|   |-- CHANGES
|   |-- README
|   |-- code
|   |   |-- __pycache__
|   |   `-- convertall.py
|   |-- dataset_description.json
|   |-- participants.tsv
|   |-- sub-219
|   |   `-- ses-itbs
|   `-- task-rest_bold.json
|   |--derivatives
`-- dicominfo.tsv
HeuDiConv does not need the derivatives directory. It is included here so you can see how the whole structure will be laid out. You can name your project, and the Nifti directory as you wish. The BIDS standard expects you to put your output under a directory named derivatives. If you wish to hold the results of different processing pipelines, simply create subdirectories under derivatives for each pipeline (fmriprep will assume it should put its output in a subdirectory under derivatives, so you don’t have to provide it with this nesting). You may have to specify this nesting for other containers.
You are likely to have
IMAfiles if you copied your images from the scanner to an external drive, but you are likely to have.dcmfiles if you exported your images from Horos or Osirix. Watch out for capitalization differences in the sequence names (.dcmfiles are typically lower case, butIMAfiles are typically upper case).Heudiconv will extract age and sex info from the DICOM header. If there is any reason to believe this information is wrong in the DICOM header (for example, it was made-up because no one knew how old the subject was, or it was considered a privacy concern), then you need to check it. If you have Horos (or another DICOM editor), you can check and edit the values there so they will be correct when you export them.
If you have multiple sessions at the scanner, you should create an Exam folder for each session. This will help you to keep the data organized and Exam will be reported in the study_description in your dicominfo.tsv, so that you can use it as a criterion.
Warning
Do not assume that different subjects have the same values in the DICOM headers. That is, if you develop a convertall.py on one subject, try it and carefully evaluate the results on your other subjects. This is especially true if you already collected the data before you started thinking about automating the output. Every time you run HeuDiConv with convertall.py, a new dicominfo.tsv file is generated. Inspect this for differences in protocol names and series descriptions etc.
Warning
I recently (03/11/2019) found that heudiconv failed if the data I exported from Horos was not decompressed. This was especially confusing because dcm2niix succeeded on this data…hmm.
Warning
If you have combined multiple sessions in one dicom folder, heudiconv will fail to run and will complain about “conflicting study identifiers”. You can get around the problem by figuring out which dicoms are from different studies and separating them so you deal with one set at a time.
Walkthrough of HeuDiConv Run
The following examples assume you are at the bash shell prompt. You need to download dicoms_heudiconv.zip and unzip it into a directory. Let’s call that directory MyProject (see above).
The data in dicoms_heudiconv.zip was exported from Horos (so it uses lower case and the
.dcmextension)Here we assume you have downloaded Docker and have it running. Then you need to pull the HeuDiConv Docker container to your machine:
docker pull nipy/heudiconv
Step 1
From the MyProject directory, run the following Docker command to process the dcm files that you downloaded and unzipped for this tutorial. The subject number is 219:
docker run --rm -it -v ${PWD}:/base nipy/heudiconv:latest -d /base/Dicom/{subject}/*/*.dcm -o /base/Nifti/ -f convertall -s 219 -c none
Warning
The above docker command works in bash, but may not work in other shells. For example, zsh is uset by the form {subject} but bash actually doesn’t mind.
--rmmeans Docker should cleanup after itself (it removes the instance after it runs)-itmeans Docker should run interactively-v ${PWD}:/basebinds your current directory to/baseinside the container. You could also provide an absolute path to the MyProject directory.nipy/heudiconv:latestsays to use the latest version of heudiconv.-d /base/Dicom/{subject}/*/*.dcmsays to look for a directory called Dicom in the current directory (MyProject). Under Dicom HeuDiConv should look for the subject directory (e.g., 219). Actual dcm files will then be under any subdirectories at this level:Dicom |-- 219 | |-- ASL_3D_tra_iso_22 | |-- AX_DE_TSE_14 | |-- Bzero_verify_PA_17 | |-- DTI_30_DIRs_AP_15 | |-- DTI_30_DIRs_AP_TENSOR_16 | |-- JJWANGS_pCASL_PLD1800_24 | |-- JJWANGS_pCASL_PLD1800_34 | |-- Localizers_1 | |-- MoCoSeries_19 | |-- MoCoSeries_31 | |-- Perfusion_Weighted_23 | |-- Perfusion_Weighted_25 | |-- Perfusion_Weighted_33 | |-- Perfusion_Weighted_35 | |-- Post_TMS_ASL_3D_tra_iso_32 | |-- Post_TMS_restingstate_30 | |-- T1_mprage_1mm_13 | |-- field_mapping_20 | |-- field_mapping_21 | `-- restingstate_18
-o /base/Nifti/says to put the output in a directory called Nifti (i.e., MyProject/Nifti). If the Nifti directory does not exist, it will be created.-f convertallThis creates a convertall.py template from an existing heuristic module. There are other heuristic modules , e.g., banda-bids.py, bids_with_ses.py, cmrr_heuristic.py, example.py, multires_7Tbold.py, reproin.py, studyforrest_phase2.py, test_reproin.py, uc_bids.py. convertall.py is a good default though.-s 219says the subject number is 219.219will replace {subject} in the-dargument when Docker actually runs.-c nonesays we are not actually doing any conversion right now. Instead we are going to generate dicominfo.tsv and convertall.py in the hidden directory .heudiconv under your output directory, e.g. MyProject/Nifti/.heudiconvYou should create a directory called code under your output directory (e.g., the Nifti directory) and copy convertall.py from .heudiconv/info to code. This is useful because you can look back at the original template in the hidden directory if you need to, but you can use convertall.py in the code directory to test your modifications.
Step 1 only needs to be completed once correctly for each project.
Step 2
Now we want to modify three sections in convertall.py. You can download the final version here: convertall.py
The Modifications Explained
Your goal is to produce a working convertall.py that will arrange the output in a BIDS directory structure. However, keep in mind that the hidden .heudiconv directory gets updated every time you run heudiconv. In addition, both your code directory and your .heudiconv directory provide valuable provenance information that should remain with your data. Once you create a working convertall.py, you can run it for different subjects and sessions (keep reading).
The convertall.py template contains a lot of explanatory text for you to read. I have removed this from the final version to keep it short.
I provide three section labels (1, 1b and 2) to facilitate exposition here. Each of these sections should be manually modified by you for your project.
Section 1
This convertall.py does not import all sequences in the example Dicom directory. This is a feature of heudiconv: You do not need to import scouts, motion corrected images or other dicoms of no interest.
You may wish to add, modify or remove keys from this section for your own data:
# Section 1: These key definitions should be revised by the user
###################################################################
# For each sequence, define a key and template using the create_key function:
# key = create_key(output_directory_path_and_name).
#
# The "data" key creates sequential numbers which can be for naming sequences.
# This is especially valuable if you run the same sequence multiple times at the scanner.
data = create_key('run-{item:03d}')
t1w = create_key('sub-{subject}/{session}/anat/sub-{subject}_{session}_T1w')
tse = create_key('sub-{subject}/{session}/anat/sub-{subject}_{session}_acq-tse_T2w')
dwi = create_key('sub-{subject}/{session}/dwi/sub-{subject}_{session}_acq-AP_dwi')
fmap_rev_phase =  create_key('sub-{subject}/{session}/fmap/sub-{subject}_{session}_dir-PA_epi')
fmap_mag =  create_key('sub-{subject}/{session}/fmap/sub-{subject}_{session}_magnitude')
fmap_phase = create_key('sub-{subject}/{session}/fmap/sub-{subject}_{session}_phasediff')
func_rest = create_key('sub-{subject}/{session}/func/sub-{subject}_{session}_task-rest_run-01_bold')
func_rest_post = create_key('sub-{subject}/{session}/func/sub-{subject}_{session}_task-rest_run-02_bold')
asl = create_key('sub-{subject}/{session}/func/sub-{subject}_{session}_acq-asl_run-01')
asl_post = create_key('sub-{subject}/{session}/func/sub-{subject}_{session}_acq-asl_run-02')
- Key
- Define a short key for each image sequence you wish to export. Note that you can use any key names you want (e.g. foo would work as well as fmap_phase), but you need to be consistent, and you should choose key names that are short and easy to understand.
- The
keyname is to the left of the=for each row in the above example.
- Template
- Use the variable
{subject}to make the code general purpose, so you can apply it to different subjects in Step 3. - Use the variable
{session}to make the code general purpose only if you have multiple sessions for each subject.- Once you use the variable
{session}, ensure that a session gets added to the output path, e.g.,sub-{subject}/{session}/anat/and the output filename:sub-{subject}_{session}_T1wfor every image in the session. Otherwise you will get bids-validator errors.
- Once you use the variable
- It is up to you to define the output directories and file names according to the BIDS specification.
- Note the output names for the fieldmap images (e.g., sub-219_ses-itbs_dir-PA_epi.nii.gz, sub-219_ses-itbs_magnitude1.nii.gz, sub-219_ses-itbs_magnitude2.nii.gz, sub-219_ses-itbs_phasediff.nii.gz), and that the reverse_phase encode dwi image (e.g., sub-219_ses-itbs_dir-PA_epi.nii.gz) is grouped with the fieldmaps. These naming strategies were less than obvious to me, but they are what the bids specification expects.
- ASL and TSE images were not described in the BIDS specification as of this writing. Data that is not yet defined in the specification will cause the bids-validator to produce an error unless you include it in a .bidsignore file. The output filenames and organization used here for ASL and TSE images were created after consultation with the bids google group, but they still needed to be in the .bidsignore file.
- Use the variable
- data
- a key definition that creates sequential numbering
03dmeans create three slots for digits3d, and pad with zeros0.- This is useful if you have a scanner sequence with a single name but you run it repeatedly and need to generate separate files for each run. For example, you might define a single functional sequence at the scanner and then run it several times instead of creating separate names for each run.
Note
N.B. It is usually better to name your sequences explicitly rather than depending on sequential numbering. There will be less confusion later.
- If you have a sequence with the same name that you run repeatedly WITHOUT the sequential numbering, HeuDiConv will overwrite earlier sequences with later ones.
- To ensure that a sequence includes sequential numbering, you also need to add
run-{item:03d}(for example) to the key-value specification for that sequence. - Here I illustrate with the t1w key-value pair:
- If you started with:
t1w = create_key('sub-{subject}/anat/sub-{subject}_T1w'),
- You could add sequence numbering like this:
t1w = create_key('sub-{subject}/anat/sub-{subject}_run-{item:03d}_T1w').
- Now if you run several T1w images using the exact same protocol, each will get a separate run number like this:
- sub-219_ses_run-001_T1w.nii.gz, sub-219_ses_run-002_T1w.nii.gz etc.
- If you started with:
Section 1b
Based on your chosen keys, create a data dictionary called info:
# section 1b: This data dictionary (below) should be revised by the user.
##########################################################################
# Enter a key in the dictionary for each key you created above in section 1.
info = {data: [], t1w: [], tse: [], dwi: [], fmap_rev_phase: [], fmap_mag: [], fmap_phase: [], func_rest: [], func_rest_post: [], asl: [], asl_post: []}
# The following line does no harm, but it is not part of the dictionary.
last_run = len(seqinfo)
Enter each key in the dictionary in this format
key: [], for example,t1w: [].Separate the entries with commas as illustrated above.
Section 2
Define criteria for identifying each DICOM series that corresponds to one of the keys you want to export:
# Section 2: These criteria should be revised by user.
##########################################################
# Define test criteria to check that each DICOM sequence is correct
# seqinfo (s) refers to information in dicominfo.tsv. Consult that file for
# available criteria.
# Here we use two types of criteria:
# 1) An equivalent field "==" (e.g., good for checking dimensions)
# 2) A field that includes a string (e.g., 'mprage' in s.protocol_name)

for idx, s in enumerate(seqinfo):
    if ('mprage' in s.protocol_name) and (s.dim3 == 176):
        info[t1w].append(s.series_id)
    if ('TSE' in s.protocol_name):
        info[tse].append(s.series_id)
    if ('DTI' in s.protocol_name) and (s.dim3 == 74) and (s.dim4 == 32):
        info[dwi].append(s.series_id)
    if ('verify_P-A' in s.protocol_name):
        info[fmap_rev_phase] = [s.series_id]
    if ('field_mapping' in s.protocol_name) and (s.dim3 == 64):
        info[fmap_mag] = [s.series_id]
    if ('field_mapping' in s.protocol_name) and (s.dim3 == 32):
        info[fmap_phase] = [s.series_id]
    if ('restingstate' == s.protocol_name):
        info[func_rest].append(s.series_id)
    if ('Post_TMS_restingstate' == s.protocol_name):
        info[func_rest_post].append(s.series_id)
    if ('ASL_3D_tra_iso' == s.protocol_name):
        info[asl].append(s.series_id)
    if ('Post_TMS_ASL_3D_tra_iso' == s.protocol_name):
        info[asl_post].append(s.series_id)
return info
To define the criteria, look at dicominfo.tsv in .heudiconv/info. This file contains tab-separated values so you can easily view it in Excel or any similar spreadsheet program. dicominfo.tsv is not used programmatically to run heudiconv (i.e., you could delete it with no adverse consequences), but it is very useful for defining the test criteria for section 2 of convertall.py.
Some values in dicominfo.tsv might be wrong. For example, my reverse phase encode sequence with two acquisitions of 74 slices each is reported as one acquisition with 148 slices (2018_12_11). Hopefully they’ll fix this. Despite the error in dicominfo.tsv, dcm2niix reconstructs the images correctly.
You will be adding, removing or altering values in conditional statements based on the information you find in dicominfo.tsv.
seqinfo(s) refers to the same information you can view in dicominfo.tsv (although seqinfo does not rely on dicominfo.tsv).Here we illustrate two types of criteria:
s.dim3 == 176is an equivalence (e.g., good for checking dimensions for a numerical data type). For our sample T1w image to be exported from DICOM, it must have 176 slices in the third dimension.'mprage' in s.protocol_namesays the protocol name string must include the word mprage for the T1w image to be exported from DICOM. This criterion string is case-sensitive.
info[t1w].append(s.series_id)Given that the criteria are satisfied, the series should be named and organized as described in Section 1 and referenced by the info dictionary. The information about the processing steps is saved in the .heudiconv subdirectory.Here I have organized each conditional statement so that the sequence protocol name comes first followed by other criteria if relevant. This is not necessary, though it does make the resulting code easier to read.
Step 3
You have now done all the hard work for your project. When you want to add a subject or session to MyProject, you only need to run this third step for that subject or session (A record of each run is kept in .heudiconv for you):
docker run --rm -it -v ${PWD}:/base nipy/heudiconv:latest -d /base/Dicom/{subject}/*/*.dcm -o /base/Nifti/ -f /base/Nifti/code/convertall.py -s 219 -ss itbs -c dcm2niix -b --minmeta --overwriteThe first time you run this step, several important text files are generated (e.g., CHANGES, dataset_description.json, participants.tsv, README etc.). On subsequent runs information may be added (e.g., participants.tsv will be updated). Other files, like the README and dataset_description.json should be filled in manually after they are first generated.
This Docker command is slightly different from the previous Docker command you ran.
-f /base/Nifti/code/convertall.pynow tells HeuDiConv to use your revised convertall.py in the code directory.- In this case, we specify the subject we wish to process
-s 219and the name of the session-ss itbs.- We could specify multiple subjects like this:
-s 219 220 -ss itbs
- We could specify multiple subjects like this:
-c dcm2niix -bindicates that we want to use the dcm2niix converter with the -b flag (which creates BIDS).--minmetaensures that only the minimum necessary amount of data gets added to the JSON file when created. On the off chance that there is a LOT of meta-information in the DICOM header, the JSON file will not get swamped by it. fmriprep and mriqc are very sensitive to this information overload.--overwriteThis is a peculiar option. Without it, I have found the second run of a sequence does not get generated. But with it, everything gets written again (even if it already exists). I don’t know if this is my problem or the tool…but for now, I’m using--overwrite.
Step 3 should produce a tree like this:
|-- dataset_description.json
|-- participants.tsv
|-- sub-219
|   `-- ses-itbs
|       |-- anat
|       |   |-- sub-219_ses-itbs_T1w.json
|       |   |-- sub-219_ses-itbs_acq-tse_T2w1.json
|       |   |-- sub-219_ses-itbs_acq-tse_T2w1.nii.gz
|       |   |-- sub-219_ses-itbs_acq-tse_T2w2.json
|       |   |-- sub-219_ses-itbs_acq-tse_T2w2.nii.gz
|       |   `-- sub-219_ses_itbs_T1w.nii.gz
|       |-- dwi
|       |   |-- sub-219_ses-itbs_acq-AP_dwi.bval
|       |   |-- sub-219_ses-itbs_acq-AP_dwi.bvec
|       |   |-- sub-219_ses-itbs_acq-AP_dwi.json
|       |   `-- sub-219_ses-itbs_acq-AP_dwi.nii.gz
|       |-- fmap
|       |   |-- sub-219_ses-itbs_dir-PA_epi.json
|       |   |-- sub-219_ses-itbs_dir-PA_epi.nii.gz
|       |   |-- sub-219_ses-itbs_magnitude1.json
|       |   |-- sub-219_ses-itbs_magnitude1.nii.gz
|       |   |-- sub-219_ses-itbs_magnitude2.json
|       |   |-- sub-219_ses-itbs_magnitude2.nii.gz
|       |   |-- sub-219_ses-itbs_phasediff.json
|       |   `-- sub-219_ses-itbs_phasediff.nii.gz
|       |-- func
|       |   |-- sub-219_ses-itbs_acq-asl_run-01.json
|       |   |-- sub-219_ses-itbs_acq-asl_run-01.nii.gz
|       |   |-- sub-219_ses-itbs_acq-asl_run-02.json
|       |   |-- sub-219_ses-itbs_acq-asl_run-02.nii.gz
|       |   |-- sub-219_ses-itbs_task-rest_run-01_bold.json
|       |   |-- sub-219_ses-itbs_task-rest_run-01_bold.nii.gz
|       |   |-- sub-219_ses-itbs_task-rest_run-01_events.tsv
|       |   |-- sub-219_ses-itbs_task-rest_run-02_bold.json
|       |   |-- sub-219_ses-itbs_task-rest_run-02_bold.nii.gz
|       |   `-- sub-219_ses-itbs_task-rest_run-02_events.tsv
|       `-- sub-219_ses-itbs_scans.tsv
`-- task-rest_bold.json
Exploring Criteria
dicominfo.tsv contains a human readable version of seqinfo. Each column of data can be used as criteria for identifying the correct dicom image. We have already provided examples of using string types and numbers, but Booleans (True-False) and Tuples (immutable lists) are also available and examples of using these are provided below. To ensure that you are extracting the images you want, you need to be very careful about creating your initial convertall.py.
Before experimenting with criteria, I suggest you copy the Makefile example below into your project directory:
what:
      @echo "Make what? Try 'clean' or 'run'"

clean:
      rm -rf Nifti/sub-* Nifti/.heudiconv

run:
      docker run -it --rm -v ${PWD}:/base nipy/heudiconv:latest -d /base/Dicom/{subject}/*/*.dcm -o /base/Nifti/ -f /base/Nifti/code/convertall.py -s 219 -ss itbs -c dcm2niix -b --overwrite
Ensure that you used the naming strategy and modify path names for your environment if necessary. Now you can type make clean to remove the .heudiconv and Nifti subject directory. Type make run to run the docker command.
Why Experiment?
Criteria can be tricky. Ensure the NIFTI files you create are the correct ones (for example, not the derived or motion corrected if you didn’t want that). In addition to looking at the images created (which tells you whether you have a fieldmap or T1 etc.), you should look at the dimensions of the image. For really tricky cases, download and install dcm2niix on your local machine and run it for a sequence of concern. Not only the dimensions, but the range of intensity values and the size of the image on disk should match for dcm2niix and heudiconv’s convertall.py.
- In the tutorial dataset, the ASL_3D_tra_iso_22 and Perfusion_Weighted_23 series are very similar, except the Perfusion weighted dataset is derived from the original ASL dataset, and the Perfusion dataset is smaller on disk (ASL image=~346 KB; Perfusion image=~128 KB). If you experiment with these two images, you can ensure that each was named as you expected.
- Although Python does not require you to use parentheses while defining criteria, parentheses are a good idea. Parentheses will help ensure that complex criteria involving multiple logical operators
and, or, notmake sense and behave as expected.
Booleans
There are two columns containing Boolean True/False information in dicominfo.tsv, is_derived and is_motion_corrected. To help you work with Booleans, you can experiment with the ASL and Perfusion images mentioned above. They can be distinguished by the value in is_derived:
if ('ASL_3D_tra_iso' == s.protocol_name):
               if (s.is_derived):
      info[asl_der].append(s.series_id)
   else:
      info[asl].append(s.series_id)
This conditional writes both images as different sequences. s.is_derived is True if the value in the is_derived column is true, and the Perfusion image is written to NIFTI. Otherwise (else) s.is_derived is not true and so the ASL image is written.
Of course, these particular examples depend on the creating of a key for each image:
asl = create_key('sub-{subject}/{session}/func/sub-{subject}_{session}_acq-asl')
asl_der = create_key('sub-{subject}/{session}/func/sub-{subject}_{session}_acq-asl_der')
To write only the original image and not the derived image, the following criteria would work:
if ('ASL_3D_tra_iso' == s.protocol_name):
             if (not s.is_derived):
      info[asl].append(s.series_id)
Tuples
Suppose you want to use the values in the field image_type? It is not a number or string or Boolean. How do we discover the data type of a column? You can add a statement like this print(type(s.image_type)) to the for loop in section 2 of convertall.py. Then run convertall.py (preferably without any actual conversions) and you should see an output like this <class 'tuple'>. Here is an example of using a value from image_type as a criterion:
if ('ASL_3D_tra_iso' == s.protocol_name) and ('TTEST' in s.image_type):
   info[asl_der].append(s.series_id)
Note that this differs from testing for a string because we cannot test for any substring (e.g., ‘TEST’ would not work). String tests will not work on a tuple datatype.
Note
image_type is described in the DICOM specification
reproin.py
If you don’t want to modify a Python file as we do for convertall.py, an alternative is to name your image sequences at the scanner using the reproin naming scheme. Take some time getting the scanner protocol right, because it is the critical job for running reproin. Then a single Docker command converts your DICOMS to the BIDS data structure. There are more details about reproin in the Links section above.
Walkthrough of Reproin Run
Download this phantom dataset: dicoms_reproin_UA.zip generated here at the University of Arizona on our Siemens Skyra 3T with Syngo MR VE11c software on 2018_02_08. This is a simple reproin-compliant dataset without sessions. Derived dwi images (ADC, FA etc.) that the scanner produced were removed.
We’ll assume you already have Docker installed and have downloaded HeuDiConv as described above. Create a new directory, lets call it ReproUA. Change directory to ReproUA and create a subdirectory called Dicom. Unzip dicoms_reproin_UA.zip in the Dicom directory. You should have a directory structure like this:
ReproUA
`-- Dicom
    |-- 001
From the ReproUA directory, run this Docker command:
docker run --rm -it -v ${PWD}:/base nipy/heudiconv:latest -f reproin --bids -o /base/Nifti --files /base/Dicom/001
That’s it. Below we’ll unpack what happened.
At the Scanner
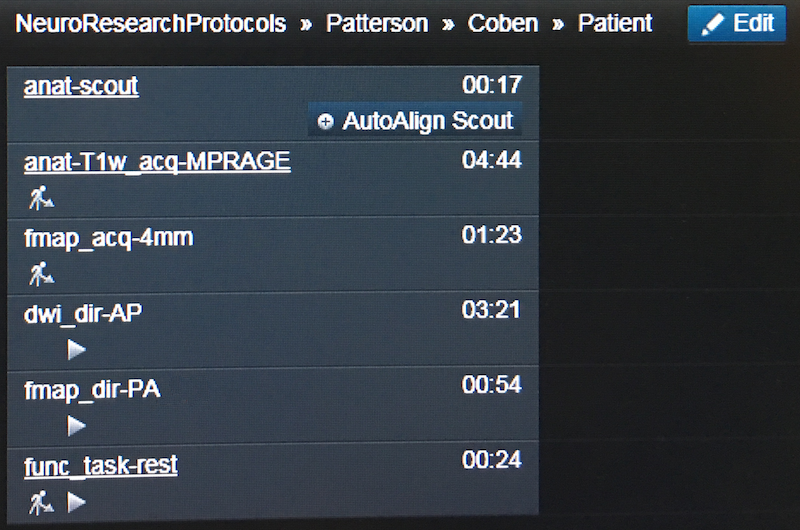
Here is our phantom dataset displayed in the scanner dot cockpit. The directory structure is defined at the top: Patterson >> Coben >> Patient
- Region = Patterson
- Exam = Coben
- Program = Patient
Output Directory Structure
Reproin produces a hierarchy of BIDS directories like this:
.
`-- Patterson
    `-- Coben
        |-- sourcedata
        |   `-- sub-001
        |       |-- anat
        |       |-- dwi
        |       |-- fmap
        |       `-- func
        `-- sub-001
            |-- anat
            |-- dwi
            |-- fmap
            `-- func
- The dataset is nested under two levels in the output directory: Region (Patterson) and Exam (Coben). Tree is reserved for other purposes at the UA research scanner.
- Although the Program Patient is not visible in the output hierarchy, it is important. If you have separate sessions, then each session should have its own Program name.
- sourcedata contains tarred gzipped (tgz) sets of DICOM images corresponding to each NIFTI image.
- sub-001 contains NIFTI and JSON pairs in addition to the metadata files BIDS wants.
File Names
For both BIDS and reproin, names are composed of an ordered series of key-value pairs. Each key and its value is joined with a dash - (e.g., acq-MPRAGE, dir-AP). These key-value pairs are joined to other key-value pairs with underscores _. The exception is the modality label, which is discussed more below.
Reproin scanner sequence names are simplified relative to the final BIDS output and generally conform to this scheme (but consult the reference for additional options): sequence type-modality label _ session-session name _ task-task name _ acquisition-acquisition detail _ run-run number _ direction-direction label.
Each sequence name begins with the seqtype key. The seqtype key is the name of the BIDS directory where the sequence belongs, e.g.,
anat,dwi,fmaporfunc.The seqtype key is optionally followed by a dash
-and a modality label value (e.g.,anat-scoutoranat-T2W). Often, the modality label is not needed because there is a predictable default for most seqtypes:- For anat the default modality is
T1W. Thus a sequence namedanatwill have the same output BIDS files as a sequence namedanat-T1w, e.g.,sub-001_T1w.nii.gzin the anat directory. - For fmap the default modality is
epi. Thusfmap_dir-PAwill have the same output asfmap-epi_dir-PA, e.g.,sub-001_dir-PA_epi.nii.gzin the fmap directory. - For func the default modality is
bold. Thus,func-bold_task-restwill have the same output asfunc_task-rest, e.g.,sub-001_task-rest_bold.nii.gzin the func directory. - Reproin gets the subject number from the DICOM metadata.
- For anat the default modality is
If you have multiple sessions, the session name does not need to be included in every sequence name in the program (i.e., Program= Patient level mentioned above). Instead, the session can be added to a single sequence name, usually the scout (localizer) sequence e.g.
anat-scout_ses-pre, and reproin will propagate the session information to the other sequence names in the Program. Interestingly, reproin does not add the localizer to your Nifti output.When our scanner exports the DICOM sequences, all dashes are removed. But don’t worry, reproin handles this just fine.
In the UA phantom reproin data, the subject was named
01. Horos reports the subject number as01but exports the DICOMS into a directory001. If the data are copied to an external drive at the scanner, then the subject number is reported as001_001and the images are*.IMAinstead of*.dcm. Reproin does not care, it handles all of this gracefully. Your output tree (excluding sourcedata) should look like this:. |-- CHANGES |-- README |-- dataset_description.json |-- participants.tsv |-- sub-001 | |-- anat | | |-- sub-001_acq-MPRAGE_T1w.json | | `-- sub-001_acq-MPRAGE_T1w.nii.gz | |-- dwi | | |-- sub-001_dir-AP_dwi.bval | | |-- sub-001_dir-AP_dwi.bvec | | |-- sub-001_dir-AP_dwi.json | | `-- sub-001_dir-AP_dwi.nii.gz | |-- fmap | | |-- sub-001_acq-4mm_magnitude1.json | | |-- sub-001_acq-4mm_magnitude1.nii.gz | | |-- sub-001_acq-4mm_magnitude2.json | | |-- sub-001_acq-4mm_magnitude2.nii.gz | | |-- sub-001_acq-4mm_phasediff.json | | |-- sub-001_acq-4mm_phasediff.nii.gz | | |-- sub-001_dir-PA_epi.json | | `-- sub-001_dir-PA_epi.nii.gz | |-- func | | |-- sub-001_task-rest_bold.json | | |-- sub-001_task-rest_bold.nii.gz | | `-- sub-001_task-rest_events.tsv | `-- sub-001_scans.tsv `-- task-rest_bold.json
Note that despite all the the different subject names (e.g.,
01,001and001_001), the subject is labeledsub-001.