Cyverse for Neuroimaging
This page provides information for the neuroimaging community about getting started with Cyverse at the University of Arizona. The focus is on a Cyverse service called Atmosphere which allows you to build or use existing virtual unix machines. An advantage of the Cyverse virtual machines over the HPC is that you have administraive access. This means you can build Singularity containers from Singularity definition files (which you cannot do on the HPC). You can also run Docker on a Cyverse virtual machine (again, because you have administrative access. There are disadvantages as well: the HPC provides access to GPU processing, Cyverse does not provide that (yet). Look at the Date Updated above to ensure that you are looking at reasonably current documentation. You can interact with Cyverse Atmosphere virtual machines at the command line or through a graphical user interface, but to use these resources effectively you should probably have some basic knowledge of unix.
Sign up for Cyverse, and then sign up for Atmosphere (a service within Cyverse that provides virtual machines).
Neuroimaging VM, version 1.1
This is an Ubuntu 16.04 machine with a graphical user interface (GUI), Neurodebian and Matlab. Core tools for analysis of fMRI, DWI and related images have been installed. In brief, this includes AFNI, FSL, Freesurfer, Slicer3D, ANTS, itksnap, Convert3d, MRIconvert, Connectome Workbench and Connectome viewer. In addition, Matlab2016b is installed and a number of Matlab toolboxes for neuroimaging: SPM8, SPM12, GIFT; For network analysis: BCT, Conn, DPABI; for EEG and MEG: EEGLAB and Brainstorm3. You can activate an instance with up to 16 cpus and 128 GB of ram, however, you Cyverse prefers that you request fewer cpus and less RAM (and you are more likely to be able to start a machine with more modest requirements.
The following Matlab toolboxes are installed: Curve Fitting Toolbox DSP System Toolbox Global Optimization Toolbox Image Processing Toolbox Neural Network Toolbox Optimization Toolbox Signal Processing Toolbox Statistical and Machine Learning Toolbox Wavelet Toolbox
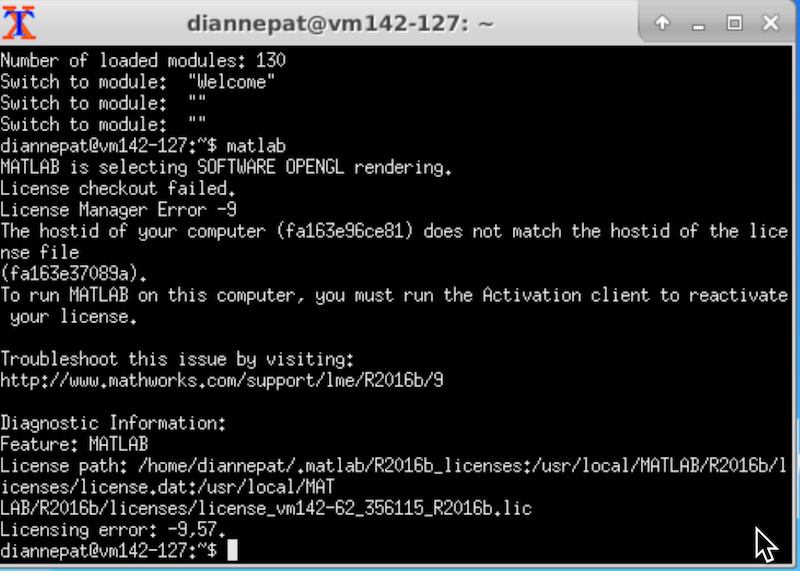
Activating Matlab on Neuroimaging VM
If you need to use matlab on the neuroimaging VM, you must activate it with your own credentials (because the hostid of the VM is not consistent). Start the activation script from the desktop or from an Xwindows capable system. The GUI interface pops up, you log in to your Matlab account (if you don’t have one, you can sign up if you are a member of the UofA community).
Run the activation script:
ActivateMatlab
Follow the instructions. Various neuroimaging Matlab toolboxes are installed under /MATLAB_TOOLS. spm12 is in the path by default, but you will need to manually add any other tools to the path. Why? Because these tools can conflict, so you only want to put what you need in the path. For example, the installed version of Gift only works with spm8 (not spm12). But if spm8 and spm12 are in the path at the same time, there will likely be conflicts. fslview is installed (but not FSLeyes) mri_deface is installed (through neurodebian). This tool allows you to remove the face from structural images so that they do not violate HIPAA standards. You can call it with the appropriate talairach and face gca files by typing:
deface.sh
You can invoke the FSL command line tool slicer like this:
slicer (invokes a commandline fsl tool)
And you can invoke the Slicer3D gui:
Slicer
General How To and Gotchas
Root
You have sudo capabilities on your instance. You can do anything to it you want. HIPAA Cyverse data storage is not currently HIPAA compliant. See deface.sh above so that your files can be deidentified.
Bye Bye Home Directory and Modifications
Unlike other linux machines you may have used, as soon as you delete your instance, your home directory is gone with it. In fact, anything you have created on the instance is gone UNLESS you request that it be saved as a new revised image.
Build Your Own
#. Modify Neuroimaging and request an image of it. You must be running the instance when you request it be imaged, and LEAVE IT RUNNING until you receive notification that your revision is complete. #. Or, you probably want to start with u1604 desktop base 50gb root not featured. This is a private VM, so you’ll need to ask for access to it. Other Cyverse base images only have 20 GB of install space for software. Given that most of our programs are 4-5 GB apiece, it is easy to run out of space installing neuroimaging software.
Web Desktop Tweaks
If you use the web desktop, I suggest you choose the “default panel” rather than the “empty panel”. The default pane provides icons on the desktop for accessing the terminal window and several installed apps:
Desktop resolution
Display the available resolutions
>xrandr -q
1   800x600       30.00    60.00

2   1024x768      30.00    60.00

3   1024x576      30.00

4   1280x960      30.00    60.00

5  1344x1008     30.00    60.00

6  1344x756      30.00

7 1600x1200     30.00    60.00
Invoke your preferred resolution (here 1600x1200):
xrandr -s 7
Terminal font size (on the desktop)
Select the terminal window and hold the Control button on your keyboard while right-clicking.
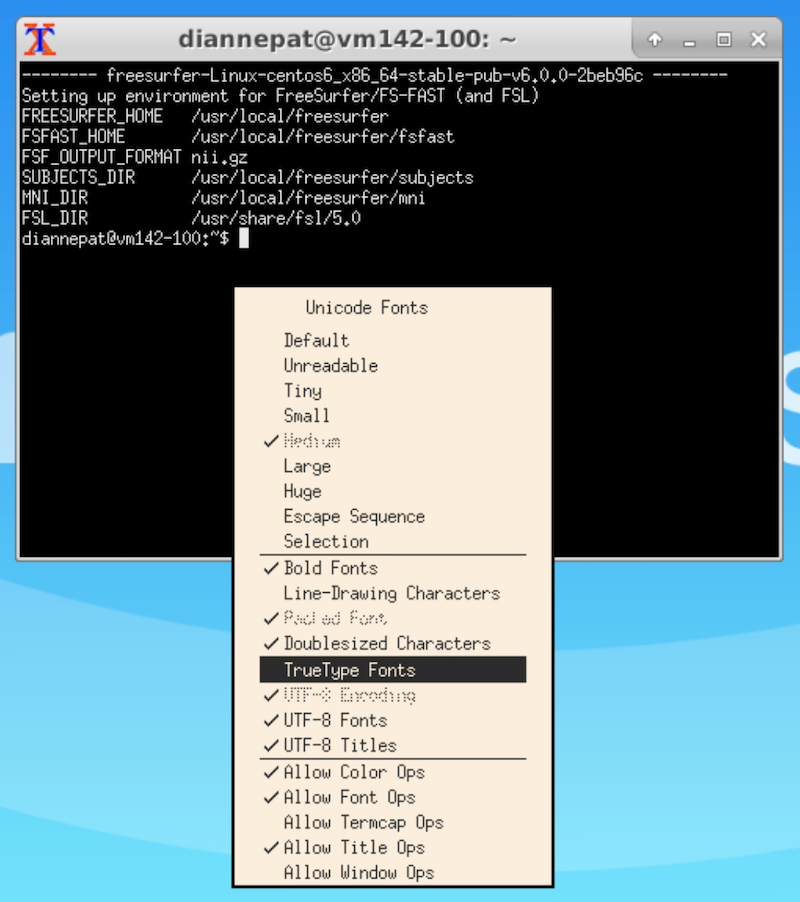
Choose TrueType Fonts. If that doesn’t do it for you, control-right-click again and select the font size you want.
Data Transfer
Cyverse has two different places to put data: #. Datastore (which you can view from the Discovery Environment). Data can be transferred to and from the datastore without running a virtual machine. Cyberduck can be set up to transfer files. icommands is a more robust (linux and mac) command line transfer utility. #. Volume. See detail below about mounting and unmounting the volume from a VM. To move data to a volume, you must first run a VM and attach the volume to the VM. You could also transfer data directly to the VM instead of a volume, but there is no speed advantage. A volume is useful in that it persists when the VM is deleted. So, you could start a small VM, transfer your data and tools to a mounted volume…in general, make sure the environment is all set up; then unmount the volume, delete the VM and start a big VM where you will actually run your processing.
Local computer to Data store: Cyberduck
Ensure the following is in .bashrc:
# Added by icommands 4.1.9 CyVerse Installer on
# On Tue Sep 19 12:35:04 MST 2017
export PATH="/Applications/icommands/:$PATH"
# Adding plugin path for older Mac OS X systems
export IRODS_PLUGINS_HOME=/Applications/icommands/plugins/
source /Applications/icommands/i-commands-auto.bash
Initialize icommands:
iinit
If this is the first time, then you need to enter:
host: data.iplantcollaborative.org
Port: 1247
User: (your Cyverse username)
Zone: iplant
Password: (your Cyverse password)
Now you have have access to some simple linux commands as icommands. For example, assuming you are coming from a Mac or linux machine, ls will still give you a listing of your local machine files. However, ils will give you a listing of the datastore files.
Pay attention to what directory you are in on the datastore when you push or pull. Here are some example commands:
iput -h # provides a man page for iput
Here are some examples of moving data between my Mac (local computer), the Cyverse datastore and the running Neuroimaging virtual machine on Atmosphere. Sync local computer to datastore (at bash prompt on local computer):
iput /Volumes/Main/Exps/Data/ROTMAN/PPA -r -K ROTMAN
-K insures error correction by doing a checksum and creating a checksum file, which will speed up data transfer with irsync later (see below). The final / insures that PPA directory is copied into ROTMAN, not just the contents of the PPA directory.
Sync contents of subject dir on local computer to same subject folder on datastore:
irsync -r sub-5167 i:/iplant/home/diannepat/ROTMAN/YC/derivatives/sub-5167
Sync datastore to local computer (again, at bash prompt on local computer):
irsync -r i:/iplant/home/diannepat/ROTMAN/PPA /Volumes/Main/Exps/Data/ROTMAN/PPA
Sync datastore to VM (from bash prompt on VM):
irsync -r i:/iplant/home/diannepat/ROTMAN/PPA /vol_c
To get out of icommands entirely:
iexit full
In addition, on every Cyverse VM there is a script called cyverse_backup.sh which tries to make this copying easier. From the VM, type:
cyverse_backup.sh
At the prompt choose restore to copy TO your virtual machine or volume FROM the data store, or choose backup to copy TO your data store FROM your virtual machine or volume. See details here cyverse_backup.sh.
Mounting a Volume
See Attaching and Detaching Volumes.
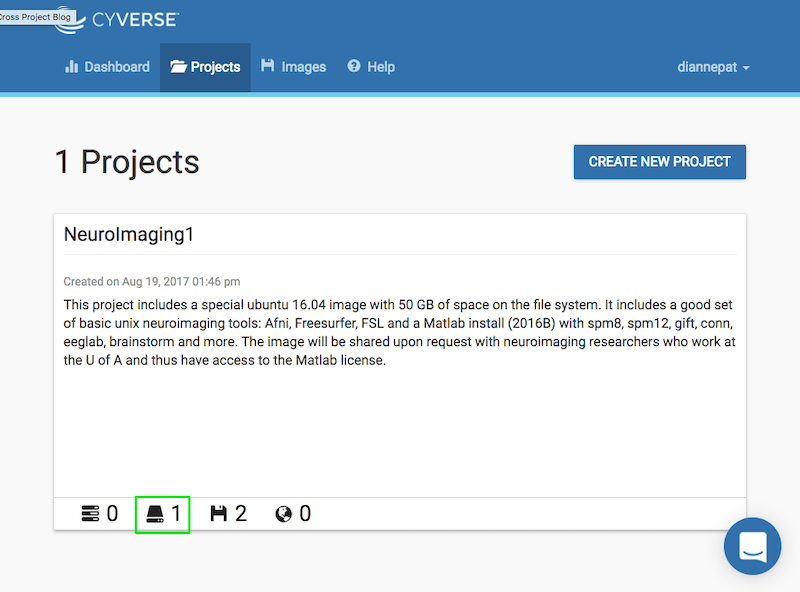
From the Atmosphere web application, choose your project and click on the volume:
You should see your volume listed as unattached:
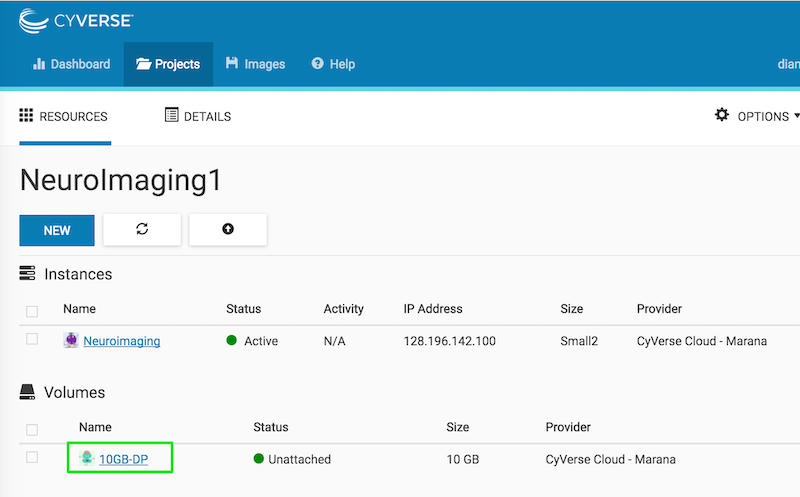
Click the attach button on the right:
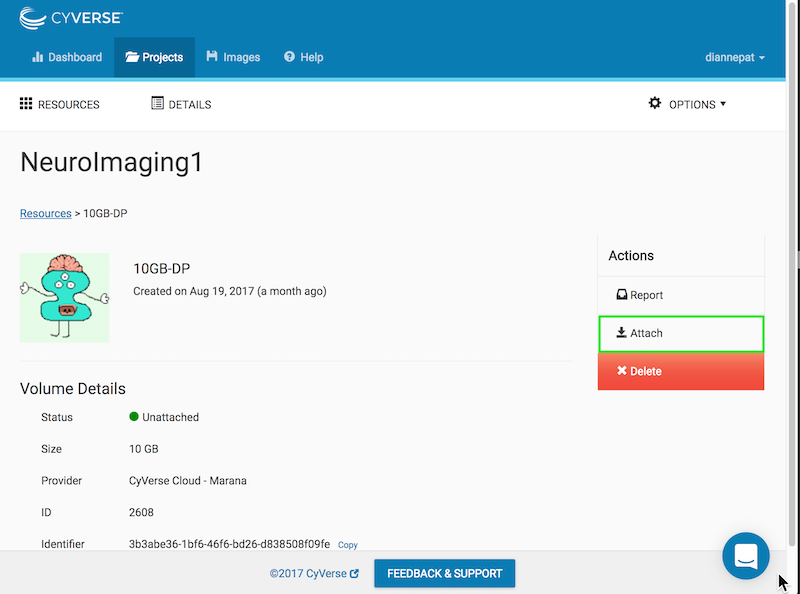
After a few moments, the volume is attached and mounted. It will appear at the root level of your running virtual machine as vol_b or vol_c
Show you the mounted filesystems:
df -h
If the mounted volume is owned by root, or you do not have permission to write to it, you need to change the permissions:
cd /
To change permissions:
sudo chmod a+rwx vol_c
To change ownership:
sudo chown myusername vol_c
Now you can use cyverse_backup.sh
Detach Volume before deleting the Instance
If the volume won’t detach, ensure there are no desktops, shells or web shells displaying information in the volume directory. Check for any processes running on that volume with lsof:
lsof | grep /vol_c

atom      24638        diannepat  cwd       DIR             253,32     4096     525174 /vol_c/bip/PROFILES

atom      24789        diannepat  cwd       DIR             253,32     4096     525174 /vol_c/bip/PROFILES
End or kill those processes with kill -9:
kill -9 24638

diannepat@vm142-119:/$ lsof |grep /vol_c

atom      24789        diannepat  cwd       DIR             253,32     4096     525174 /vol_c/bip/PROFILES
Singularity on Cyverse
If you would like to build a Singularity container from a singularity definition file, but you don’t have a linux machine with root permission, then use a Cyverse VM. At the shell prompt type:
ezs
It’ll ask for your password and install Singularity. See Singularity on the HPC to learn about how to use Singularity containers. See the BIDS page to learn about why you would use containers (Singularity or Docker).
If you are trying to build a large Singularity container and run into problems with space, then see Running out of Space.